Showing posts with label gardening. Show all posts

Thursday, May 5, 2011

New Lawn!


Last Friday just after dawn, a sod truck rumbled up the street and delivered two pallets of Marathon I.  For the next several hours we carried, laid, watered and placed 1,000 square feet of freshly harvested grass.  Here's how it looked when we first started:

And a little further along, maybe 2/3rds done:


Now, a week later, it's grown noticeably and is just about ready for its first cut.  After prepping the area for many months and basically living next to a dirt patch, it's amazing how dust-free the house and porch stay.  Next up? Flowers, flowers, flowers!

Sunday, April 17, 2011

Back in the Yard

 It's been quite a while since I've shown more of our yard progress.  And, although we slowed down a little at the end of last fall, we did accomplish several large tasks over the last few months -- boardwalk, beach rock borders, painting...  Here's a little peek at what's moved ahead:

 The wall is officially blue! On sunny days the palms cast great shadows on the wall and orange and white flowers really pop against its brightness.

Above is a newly formed flower bed bordered by a band of beach cobbles, each handpicked  and brought home by yours truly and my faithful elf.

Here's another view of the rock border and, in the very background, the boardwalk.  The rocks continue all the way along and also serve as a place for sprinklers.  

Next up? A few sprinkler adjustments, grass, flowers, transplanting... slowly but surely it's all coming together!

Thursday, October 21, 2010

New Yard Project: More Patio

I've tried to resist doing two yard project posts in a row, but I'm too excited not to today! Yesterday we had a brief break in the rain -- just long enough for the sun to come out, dry things a bit and let me snap a few pictures.  This was before all the edge stones had been cut so you can see a few bare areas above.  I'm still mystified that one asymmetrical shape can fit together like this:

See the urn at the end of the wall? That's been sitting there empty for a while, but now happily has a foxtail palm in it.  The foxtail had been in the ground but, being a palm that's a bit finicky and needs extra TLC, wasn't performing too well.  They thrive in pots and like wet soil, so it'll be much easier to care for now.  It's also going to cast pretty shadows on the patio in the summer months.

It's another rainy day today so we're on hold again.  We still need to sweep sand into the joints and stomp around to encourage it to compact down.  It's amazing how much sand it takes, usually more than you think.  After sand sweeping our next phase is the lawn area.  There are several weeds to pull and a whole lot of leveling and smoothing in the near future.

Tuesday, October 19, 2010

New Yard Project: Patio Progress!

The middle of last week was dedicated to moving the patio forward in several huge steps.  After spending several hours leveling our area, we spread gravel from the brickyard, leveled it as best we could and began tamping it down by hand.  Not pleased with the results, we ended up renting a power tamper that worked like a charm -- as it vibrates itself forward, it totally compacts the gravel.  See it above and how large its plate is compared with the hand tamper next to it? Here's a close up view of its handiwork:

With the area tamped and level, it was time to spread sand.  After a trip to the local brickyard for two scoops of masonry sand, we were ready to start distribution.  One of my jobs was to climb in the truck and push the sand toward the back for easy shoveling:

Spreading it was super satisfying! We could really see the patio shaping up quickly and felt like we were making major progress:

Once the sand was distributed everywhere we gave it a pass over with the power tamper:

Next up came the fun part: paver placement.  Can you believe I made six trips to Home Depot in two days to pick up loads of pavers? We chose a faux flagstone in a terracotta hue to tie in with the saltillo tiles on our porch.  These are a uniform shape that interlock and go down super easily.  It's amazing how one shape can fit together so well.

We got the majority of them placed just before a rain storm moved in.  Unfortunately, when I had a chance to take a picture it was already pouring, and hasn't let up for more than a few soggy minutes since then.  So... more photos coming soon, weather permitting :) I'm excited to show you how it looks!

Wednesday, October 6, 2010

New Yard Project Part 4: The Blue Wall

Next on our yard to-do list is choosing a striking wall color. We're inspired by the above photo of a blue stucco wall somewhere in the Yucatan. A bold color sure makes the palms pop! And it's almost the exact same color as the sky. Below is our wall and a few color chips. The idea is to make our palms pop, too, with the vines creating an undersea kelp effect.

What do you think? Do any of these blues look like the "the one"? After a while, they all start to look really similar.

So far we're partial to the above chip, second from the bottom.

Sunday, September 12, 2010

New Yard Summer Project Part 3: Labor Day

I'm super excited to say that we've accomplished most of the major removal stuff in the yard. The big palms are all out and the old lawn is dug up! Look above, can you believe there used to be three 20 ft. queen palms grouped just behind where the wall ends?

Speaking of where the wall ends... we terraced the layers and added a handsome yellowish pot that will soon be home to a fox tail palm. Below, you can see where we marked a potential planting area.

Pretty soon we'll be placing the patio stones and I can hardly wait! We found a molded cement style that mimics flagstone at a fraction of the price (love you Home Depot!). There are several different shapes designed to fit together so we'll have fun putting the puzzle together.


Thursday, August 26, 2010

New Yard Summer Project Part 2: Another Brick in the Wall


And the work continues! Our cool and cloudy weather has turned for the warmer and a mini heat wave has kept us seeking shady tasks as we continue our yard re-do. After many trips to The Home Depot for more blocks, we've continued the wall and added another curve.

The wall will wrap around about to where the large queen palm is in the shot below, then be back filled to create a second level effect. You can see there's a palm stump -- it's coming out today as soon as I finish this post. The large queen will also come out and most likely be replaced with a king palm.


Speaking of palms, we transplanted a medium sized kentia into a pot. Here is where it used to be:

And here's its new temporary home. It took almost as long to get it into the pot as it did to dig it up!

I used to have a rickety hose reel with a handle that wobbled each time I reeled the hose in. I thought a change to a hose pot might be an upgrade and was thrilled to find this handsome pot at The Home Depot for only $23.


Time to get out there and tackle that palm stump before it gets too hot!

Sunday, August 15, 2010

New Yard Summer Project Part 1: Rock and Roll

I've alluded to some heavy gardening that's been going on around here lately and finally have some photos to share with you:

Above, a load of stones after being unloaded underneath our gingko tree. Each piece weight just over 20 lbs. and between loading, unloading and taking them to the wall area, each piece gets moved several times.

We chose Pavestone's Natural Impressions Flagstone in Charcola/Tan. When I pictured the perfect look for re-doing our raised flower beds, I envisioned something like this and hoped they actually existed. Needless to say I was overjoyed to find them at our local Home Depot! They have a little lip to "lock together" and stay in place, no mortar needed.

Here we've started laying the first course and stacking a few to see how they'll look.

And after a few hours progress a significant section takes shape.

Keeping things level is a must!

The old planters used to be wood planks with super straight lines. These stones are perfect for making gentle curves, like we've done near the palm above.

I'll have more to share soon, but for now I'm being called outside to work more!

Tuesday, July 27, 2010

In the Garden

photo by Ann Weber, Smithfield Gardens, Suffolk

There's been some major gardening going on around here lately due to the dreary weather. That's right, while the rest of the country broils, our temps are barely reaching the high 60s and we haven't seen the sun for ages. Definitely one of the strangest summers yet, but perfect for working in the yard, and I've been taking full advantage. About 50 tropicanna rhizomes have been unearthed over the last few days. Their striped foliage and pretty red hues are right up my alley and they're super easy to separate and cultivate. This isn't the time of year to divide them, but in coastal Southern California they're hearty as can be, and in no time will be looking like the ones above.


Friday, May 21, 2010

From My Garden to Yours: Pelican & Flamingo Bird Templates

This flamingo keeps watch over an ornamental garlic and group of impatiens.

The weather has been so lovely lately and absolutely perfect for gardening. With blue skies and gentle breezes, I haven't been able to resist getting out there and know I'll be glad I did when the heat of summer arrives.

This guy belonged to my great-grandmother. She gave it to my mom and my mom let me have him.

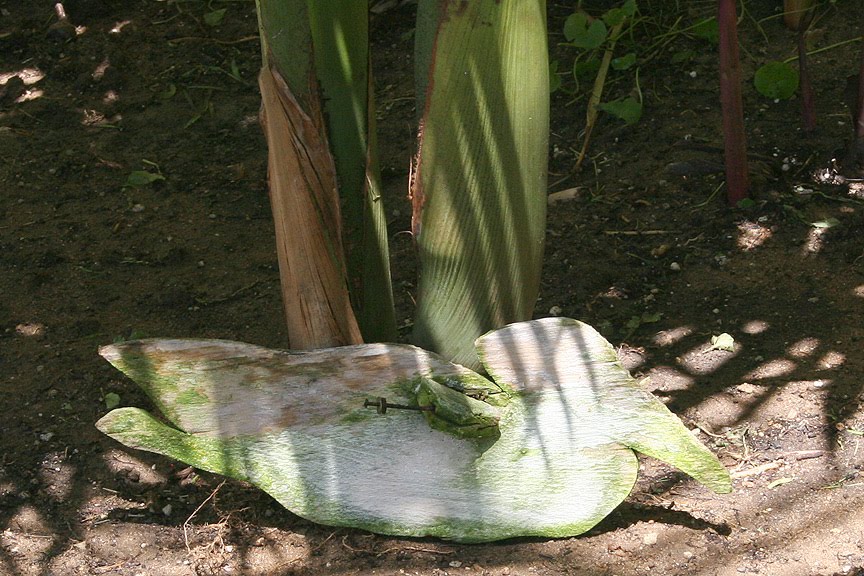
Apart from my great-grandmother's garden gnome, my absolute favorite garden accessories are several vintage wooden flamingos on stakes and one lone pelican. Over the years they've weathered beautifully to where you can see the grain of the wood. Neat patches of moss have replaced old paint, and the flamingos have faded from their original pink color.

I love how the wood grain is exposed.

Just in case you need a flamingo or pelican of your own, I've included a template below for you to download. Just click for the larger version and drag it into your desktop. You can enlarge or reduce as needed.

This pelican came off his stake, but sits quite nicely at the base of a newly planted king palm.

If you want to put one on a stake, simply drill a hole near the bottom. Using needle nose pliers bend a thick wire through the hole and squeeze it tight. You can always use one of the stake legs from a tomato cage if you're hard pressed for a thick enough wire.

A close up of how the stake is attached.
Here's the template:

Sunday, May 16, 2010

Flowers Inside and Out

Is there any such thing as too many flowers? Not around here! From an antique pitcher of my great grandma's with cabbage roses and lilies of the valley to a yard long picture with white daisies inside, and hanging baskets of fuchsias and pots of foxgloves and columbines on the patio, we welcome flowers in all their forms and colors.

Be sure to visit Mary over at Little Red House for more mosaics.

Friday, May 7, 2010

Survival of the Fittest

These plants have opted to grow in unlikely, hard-to-make-it places but are thriving nonetheless. The impatiens above are from an errant seed that burst out of a hanging basket and fell into a crack where the house, patio tiles and a cement walkway meet. Despite getting knocked into as the hose is drug past, they're growing just as well as the potted impatiens near by.


This little nasturtium above makes me smile every time I see him. He's popped up in a seam of the driveway near where I park and, being right outside my door, is in plain sight as I go in and out and always catches my eye. That's his first blossom so far and you can see there are several more buds getting ready to bloom.

Sunday, May 2, 2010

A Weekend Tending to the Plants


Cool weather made for an ideal couple of days to spend gardening, and most of Saturday and Sunday were spent in the flower beds pruning, clipping, digging, planting and separating.

My lawn chairs even got a fresh coat of paint -- bright red and a creamy yellow to match the fiery colors that have replaced the irises and other bulbs.

Time not spent in the yard was devoted to adding items to and rearranging our etsy shop, plus a bit of website work and even some sewing. Phew! I'm exhausted! How was your weekend?

And be sure to visit Mary over at Little Red House for more mosaics.

Sunday, April 25, 2010

Pink Flowers in the Shop and Garden


I can't get enough pink this weekend both in the garden and in the shop! In the garden the pink flowers are dominating -- a big group of volunteer foxgloves is just starting to bloom and the impatiens are putting on quite a show. And in the etsy shop we've been busy adding new things all week -- scraps, Dresdens, German mushrooms, flowers and some very cool destash treasures.

Be sure to visit Mary over at Little Red House for more mosaics.

Sunday, April 4, 2010

Flowers Inside and Out

Today was an Easter to remember for a rather unusual reason: a 7.2 earthquake centered in Baja California south of Mexicali gave us quite a good and long shake in the afternoon. Ironically, the quake was at a latitude of 32 Degrees North!

Otherwise we had a nice quiet Easter with splendid weather and good company. Here's a mosaic with flowers from the garden as well as flowers and textures that appear on some of my favorite inside pieces.

Hope you all had a wonderful Easter!

Be sure to visit Mary over at Little Red House for more mosaics!

Thursday, March 25, 2010

An Afternoon In the Garden

A view of my cottage from the best place to sit when the weather is warm.

Sometimes unanticipated yard work is the best and most productive kind. Sometimes one thing leads to another and simply mowing the lawn leads to heavy trimming and weeding. So went my afternoon and I am beyond thrilled!

Here's my new view from the back door: open, green and airy. No longer overgrown, dark or crying for attention.

You can see the freshly groomed palm trunk right above the calla lilies.

Other places in the garden are showing their spring colors and the irises are in full swing.

And the camellia is ready to burst with blossoms.